The prototype is a special fixed value measuring instrument widely used in mechanical manufacturing. The model line is generally composed of geometric elements such as points, lines, arcs and various function curves. The shapes of different application models are different, and the measurement calculation is complicated. The traditional measurement methods and manual calculations are not compatible with the current processing methods. Timely feedback of sample processing quality and accuracy of use information. The high-precision measurement method corresponding to the processing method must be used to evaluate the processing quality of the sample and ensure the accuracy of the use of the template.
For the convenience of the narrative, the author refers to the "virtual point" in the template and located outside the entity as the "intersection point", and is simply referred to as "point". The intersection of the model line generally has: a point on a straight line (curve), an intersection of two lines, an intersection of a line and an arc, a tangent point, an intersection of two arcs, a tangent point, a center of an arc, a straight line, an arc and The intersection, tangent point of the arbitrary function curve, and the intersection and tangent point of the two arbitrary function curves.
In the past, the measurement of the intersection position of the template was obtained by indirect measurement using a universal gauge or by an approximate method on a tool microscope. With universal gage measurement, it is necessary to establish the functional relationship of the measured parameters through the analysis of the geometric relationship of the parameters of the sample. The measurement process is complicated; the measurement is performed by a common universal tool microscope (hereinafter referred to as Wangongxian), except that the reference plate is correctly installed. The instrument guides move in the same direction, and each geometric element must be read and manually calculated. In short, whether it is a general-purpose measuring tool or a general-purpose measurement, not only the measurement process is complicated, but also the measurement accuracy is affected by the gage, the instrument and the human being, which is prone to errors and the measurement efficiency is not high.
The measurement is carried out on the microcomputer type, and the installation of the template is not restricted by the direction of movement of the instrument guide. The relationship between the geometric elements of the template, the measurement software can be automatically processed according to the program, and the measurement data can be displayed and printed. Sample measurement is very simple.
This paper briefly describes the method and program operation skills of accurately solving the coordinates of the intersection of the model on the microcomputer type.
1. Measurement and solution of intersection coordinates
When measuring on the microcomputer type, the data acquisition program is to select "element acquisition": display current coordinates → zero (initialization) → sampling.
The intersection coordinates refer to the position of the "intersection point" in a given Cartesian coordinate system.
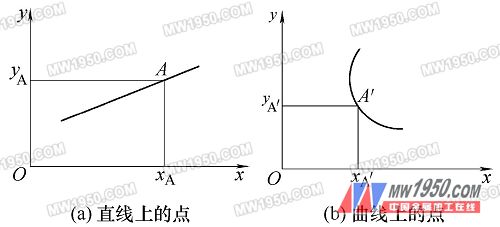
(1) The point on the straight line (curve) (see Figure 1) on the omnipotent display, accurately determine the coordinates (position) of the point on a straight line (curve), which is the so-called line method in the jargon. In the length measurement, it is required to positively press the imaginary line of the m-shaped line on the edge line of the outline, so that half of the broken line is within the image, half is outside the image, and the imaginary line at the center of the m-shaped line is used as the decision. The main basis for the location is referenced to its extension so that accurate results can be obtained.

Figure 1 Point on a straight line (curve)
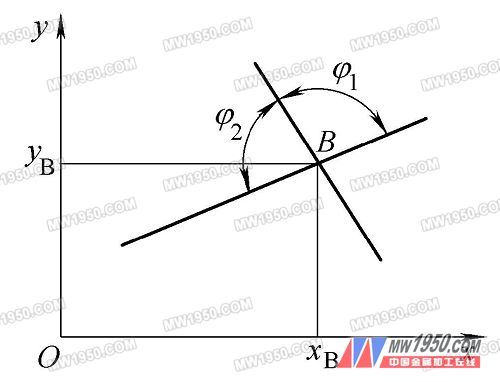
(2) The intersection and angle of the two lines (see Figure 2) The straight line equation can be established by the two known points on the measured line. The measurement method and program operation are: N points (N ≥ 2) are collected on the straight line 1 and the straight line 2 of the sample to be tested. When prompted and confirmed as prompted, the "intersection coordinates" is displayed.

Figure 2 The intersection and angle of the two lines
Next page
ShaoXing Change Auto Synchronizer Ring Co.,Ltd , https://www.sxcjautoparts.com
![<?echo $_SERVER['SERVER_NAME'];?>](/template/twentyseventeen/skin/images/header.jpg)