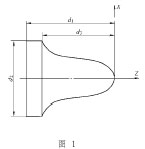
First, the basic information of the CNC car problem:
The workpiece coordinate origin is at the center of the right end face of the blank;
Blank size: 270mm long, diameter Φ65mm
Bar (can be handled as appropriate);
Processing material: 45 steel;
Precision requirements:
Roughness requirements:
Tool information: external turning tool;
Machine information: Fanuc0 i Mate_TB system.
Title: Please use variable programming to program a subroutine (macro) with parameters that can process the contour of a partial trigonometric curve as shown in Figure 1.
The trigonometric equation is:
Z = A cos( X / B )
(The parameter is D2=60 D3=70 D1=75)
Call the main program as:
%
O0010
G90T0101
G00X70.Z2.
S340M03
G01X65.F100
#4 = 29
WHILE[#4GT4] DO 1
G65 P0110 A75.B60.C70.D2.E[#4]
#4=#4-4
END 1
G65 P0110 A75.B60.C70.D2.E0
G00X80.
Z100.
%
Subroutine start behavior:
(subroutine of processing trigonometric function curve)
(Applicable to VNUC 3.0 FANUC system)
(The parameter is #2=D2 #3=D3 #4=estimated step size)
%
O0110
#102=#2*0.5 (converted to radius value d2*0.5)
#103=#3(d3)
#123=#103*0.5
#124=#102*3.1415927
#105=#7
#105=#3/#7 (estimated step size)
#106=FUP[#105]
(calculate the number of interpolation segments)
#107=#3/#106
(actual interpolation step size)
#108=0 (starting Z position)
#109=#108 (recording start)
#104=0
WHILE [#104LE#106] DO 1
#110=#108 (Z coordinate)
#115=[#110+#123]/#123
#113=[#124]*ACOS[#115]*3.14159/180.
G01 X[#113*2.0+#8] Z[#110]
#108=#108-#107
(Z coordinate minus step size)
#104=#104+1
END 1
G01W-10.
G01Z[-#7]
G0X[#2+10.+#8] (X-direction retraction)
Z2.
M99
%

Second, the basic information of CNC milling / machining center topics:
The workpiece origin is at the center of the upper surface. Blank size: 180mmx180mm (can be handled as appropriate)
Processing materials: 45 steel accuracy requirements:
Roughness requirements:
Tool information: Φ6 ball end mill Machine information: Fanuc0 i Mate_MB System topic: Please program the parameter subroutine (macro program) of the ruled surface as shown in Fig. 2 .
D1=150 D2=50 D3=30 D4=115 The workpiece origin calls the main program at the center of the upper surface:
%
O0005
G54G90G00X-80.Y-80.Z5.
S550M03
G01Z1.0F200
#1=#5043
G00X-75.Y-75.G41D1
WHILE [#1 GT -22] DO 1
#1=#1-3
IF [#1 LT -22] THEN #1=-22
Z[#1]
G01X75.
Y75.
X-75.
Y-75.
END 1
G40X-80.Y-80.
Z-20.
G00X-75.Y-75.
G65P0105A150B-20C115D0E0H3I0.5
( A = D 1 , B = Z coordinate of the bottom edge of the ruled surface, C=D4, D, E, the center coordinate of the upper surface, H = the Z coordinate of the top edge of the ruled surface, I = the angle of the circle division, the unit is the degree)
M05
M30
%
Subroutine start behavior:
%
O0105
#24=#5041
#25=#5042
#27=#5043
#30=#1/#4
#30=FUP[#30]
#4=#1/#30
#31=90/#30
#33=0
#32=225
#34=315
G01X[#7-#1/2.0]Y[#8-#1/2.0]Z[#2]
WHILE [#33 LT 4] DO 2
(four straight-sided loops)
#32=225+#33*90
#34=315+#33*90
#41=#32
#39=0
#40=0
IF [#33EQ0] THEN #39=#1/#30
IF [#33EQ1] THEN #40=#1/#30
IF [#33EQ2] THEN #39=[-#1]/#30
IF [#33EQ3] THEN #40=[-#1]/#30
#33=#33+1
WHILE [#41 LT #34] DO 1 (cycle by segmentation angle)
#35=COS[#41]*#3/2.0
#36=SIN[#41]*#3/2.0
#24=#24+#39
#25=#25+#40
G01X[#35]Y[#36]Z[#11]
G01X[#24]Y[#25]Z[#27]
#41=#41+#31
END 1
END 2
M99
%

Sisal Wheel,Sisal Buffing Wheel,Sisal Polishing Wheel,Stitched Sisal Buff
Jiangmen Gude Polishing Equipment Co., Ltd , https://www.kokipolishing.com
![<?echo $_SERVER['SERVER_NAME'];?>](/template/twentyseventeen/skin/images/header.jpg)